

MiniMax H3 Image vs Nano Banana 2.1: Which Should You Try?
Compare MiniMax H3 Image and Nano Banana 2.1 for 4K output, reference images, editing, and API pricing. Try both with the same product photo and prompt.
Your product photo is approved. The background is the only thing the client wants changed. Which image model gets you there with the fewest revisions? A new backdrop is easy to spot. A misspelled label or a cap that’s suddenly taller might slip through until the image goes live.
Try MiniMax H3 Image first if you need custom pixel dimensions, a large set of image references, or the option to run the model on your own infrastructure. Try Nano Banana 2.1 first if you want to refine a design over several turns in Gemini, explore a poster with text, or bring Google Search into the workflow. Both can generate and edit 4K images. This comparison uses public documentation and provider examples; it doesn’t rank image quality or speed from a head-to-head test.
MiniMax H3 Image vs Nano Banana 2.1 at a glance
| What you need | MiniMax H3 Image | Nano Banana 2.1 |
|---|---|---|
| A 4K still or edit | 1K, 2K, and 4K presets; the API also accepts custom dimensions within its limits | 1K, 2K, and 4K presets, with support for wide and tall aspect ratios |
| Several visual references | Up to 16 image references on the direct edit API | Up to 14 image references in the Gemini Developer API docs; limits can differ by platform |
| A way to revise the first result | Feed the output back in as an image reference for another edit | Continue editing in the same conversation where supported |
| Deployment or external context | Downloadable weights under MiniMax’s community license; hosted API also available | Google-hosted model with optional Google Web and Image Search grounding |
MiniMax H3 Image: start with a tight production brief
MiniMax introduced H3 Image on November 11, 2026 as an open-weight still-image model. The MiniMax API guide documents separate endpoints for creating an image from text and editing with references. The edit endpoint accepts up to 16 images, and custom output dimensions can go up to 20 million total pixels within the API’s size limits.
That makes it a good first trial for a catalog team that has a hero shot, a close-up of the packaging, a color swatch, and a reference for the set. Tell the model which file controls which part of the scene. Start with the hero shot and add a reference only when it resolves something specific, such as the shape of a clasp or the finish on a lid.
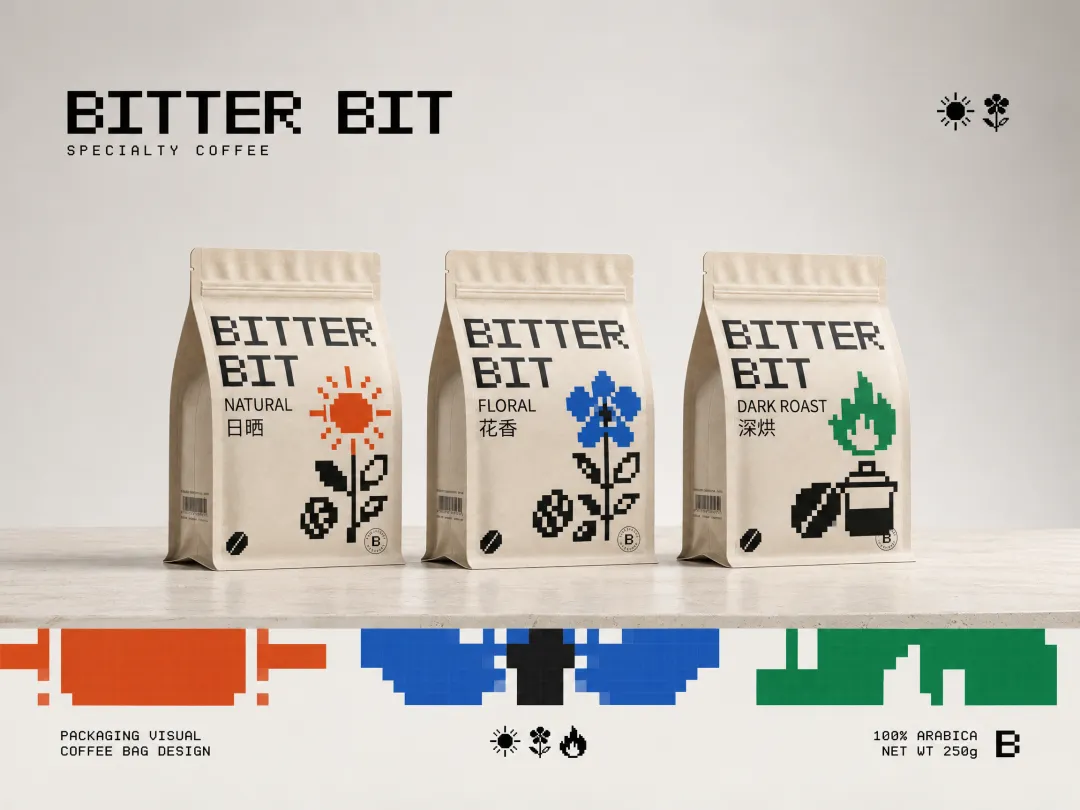
MiniMax H3 Image showcase: three coffee packages share a visual style while using different colors. For a real SKU, compare the label against the original before approving the result.
MiniMax reports generating a 4,096 × 4,096 image in under 10 seconds. Use that as a vendor reference point. If your workflow depends on speed, time the full request on your chosen endpoint, including upload and the wait for a downloadable file. For self-hosting, check the model card and community license before budgeting for hardware or deployment.
Nano Banana 2.1: start where the revisions happen
Google’s Nano Banana 2.1 model documentation describes it as an update to Nano Banana 2, with improvements in text rendering, layout, and character consistency across turns. In a conversation, you can ask for a wider crop, then ask to soften the shadow in the next turn. For a poster brief, ask for the exact headline and inspect it at the size readers will see.

Nano Banana 2.1 showcase: the bag is staged in several settings. When reviewing variations, check the clasp, strap, and silhouette before comparing the backgrounds.

Nano Banana 2.1 showcase: prominent headlines and dense supporting text pose different checks. Read the small copy separately, especially if it contains dates, prices, or measurements.
The Gemini Developer API also supports optional Search grounding. Use it when a brief depends on a real place or recognizable object. For an edit to your own product photo, start with the approved image and leave grounding off to keep the test focused on what the model preserves. You can select Nano Banana 2.1 in Google AI Studio.
A Gemini workflow for turning a brand brief into marketing visuals.
API pricing: budget for an approved image
MiniMax’s API pricing examples put a Standard edit with one 1K reference and one 4K square output at about $0.073 before promotions. That’s a sample request total; actual charges depend on token use. MiniMax lists Highspeed separately.
Google’s standard Gemini Developer API pricing lists Nano Banana 2.1 image output at $0.0336 for 1K, $0.0504 for 2K, and about $0.113 for 4K at the listed square sizes. Input tokens, text or thinking output, and applicable grounding charges are separate. These figures use different billing scopes and don’t cover browser subscriptions or third-party credits.
Use each provider’s billed total for your own comparison. If three attempts cost $0.24 and only one passes review, the cost is $0.24 per approved image. Record hands-on time separately. Five minutes spent fixing a label can matter more than a few cents on the invoice.
Try both on one approved product photo
Use a square, front-facing photo you have permission to upload, with a readable label and visible packaging edges. If you’re starting here, use our MiniMax H3 Image Editor for the H3 route, or use MiniMax’s direct API if you need specific dimensions. On both routes, record the exact model and settings you actually used. Start with one reference, one output per attempt, and three attempts per model. Use the same square output size in both tools; for an API comparison, start at 2,048 × 2,048 and log any settings you can’t match.
Replace the background with matte pale-blue studio paper and add a soft contact shadow. Keep the product in the same position and at the same size. Preserve the packaging shape, cap, logo, label spelling, and crop. Do not add props or new text.
- Inspect the product first. Compare the label letter for letter and check the cap, logo, and silhouette at 100%. Then check framing and legibility at your final listing size.
- Try one revision. On the best first pass from each model, ask: “Make the shadow lighter; keep everything else the same.” In Gemini, continue the conversation. On the H3 API route, pass the first output back as an edit input. Check the revised file against the approved original again.
- Track passes and rework. Log attempts, usable outputs, billed cost, wait time, and manual cleanup. Keep failed attempts in the count. Repeat with 4K only if it changes what you can deliver, such as a tighter crop or a larger print layout.
For a listing image, choose the route that keeps the product intact and makes the next revision easiest. If both routes redraw the packaging, keep the approved product pixels and composite them onto the new background in a layer-based editor. You still get the new scene, and the next person can adjust the shadow without touching the label.